


Build Effective Agentic Workflows: A Practical Framework
A step-by-step guide to building powerful automations, now easier than ever

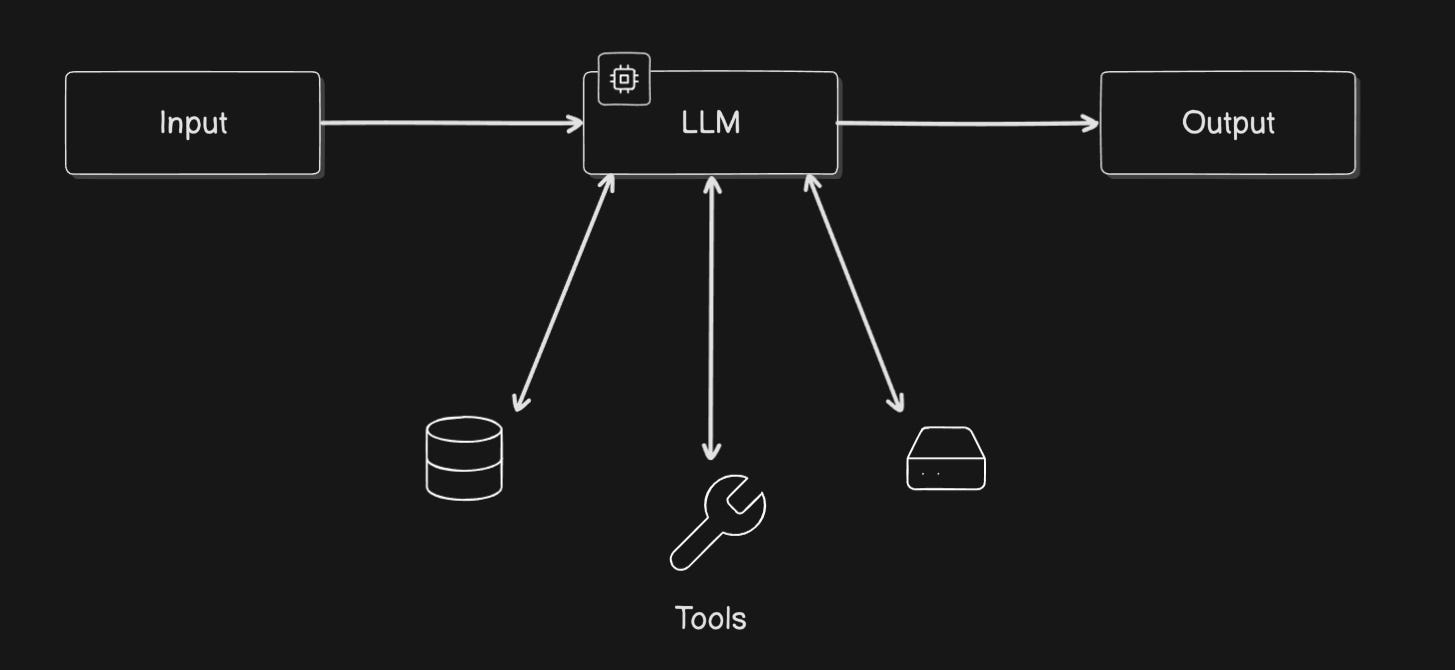
AI agents (systems where LLMs dynamically direct their own processes and tool usage, maintaining control over how they accomplish tasks) have long been seen as the future. Early versions like AutoGPT showed the potential, while frameworks like CrewAI and OpenAI's Swarms offered more structure. However, building these often has been complex, requiring intricate setups and workarounds.
The good news? Building useful, automated workflows with AI is becoming much easier, moving from a niche, technical challenge to something far more accessible. I’d like to show you how you can follow a framework to create your own Agents that can execute tasks for you. Keep in mind that this single-model approach excels at well-defined, repetitive processes rather than handling highly ambiguous or complex, multi-faceted problems.
No complex multi-agents needed here; we're focusing on one model finding its way through a task with a bit of guidance and some tools.
Why Now? When Capable Models and Standardized Tools come Together
Getting AI to reliably perform multi-step tasks using tools used to be hard. We relied on complex prompting techniques like ReAct (Reasoning and Acting), essentially trying to trick models into thinking step-by-step and deciding when to use a tool through carefully crafted text generation. It was often brittle, error-prone, and required significant expertise to get right. You'd spend hours tweaking prompts, hoping the model wouldn't go off the rails after the second or third step.
There have been some changes in how models “behave” that suddenly make agentic workflows significantly easier!
Smarter, More Enduring, and Tool-Savvy Models:
Models simply “keep going”: Models are getting smarter, but that’s not the most important part here; they're becoming more capable of sustained reasoning and task execution. Newer models, like Anthropic's Sonnet 3.7, demonstrate a much greater willingness to "keep going," generating longer, coherent outputs and performing multiple actions in sequence until a task is genuinely complete, rather than hitting an invisible wall after a few hundred words. Gemini 2.5 Pro even has a massive output limit of 64k tokens.
I don’t think its a coincidence this comes around the time of reasoning models, for which this behavior is an important aspect.
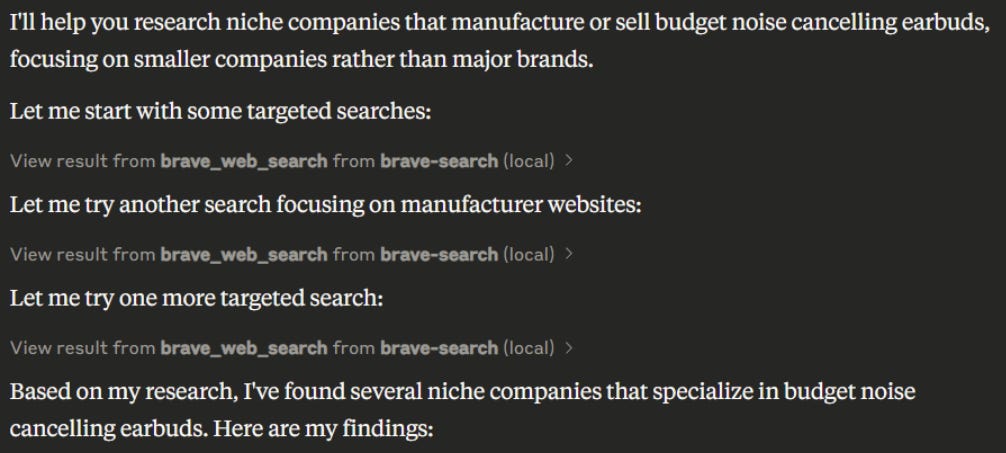
As a comparison, here’s a screenshot of Sonnet 3.5 executing a task where it has to find (smaller) manufacturers of a specific product (in this case affordable noise cancelling earbuds):

Three web searches. Came up with four results, of which one is a high-end manufacturer, and one doesn’t focus on creating earbuds. In other words, it found the first results and called it a day.
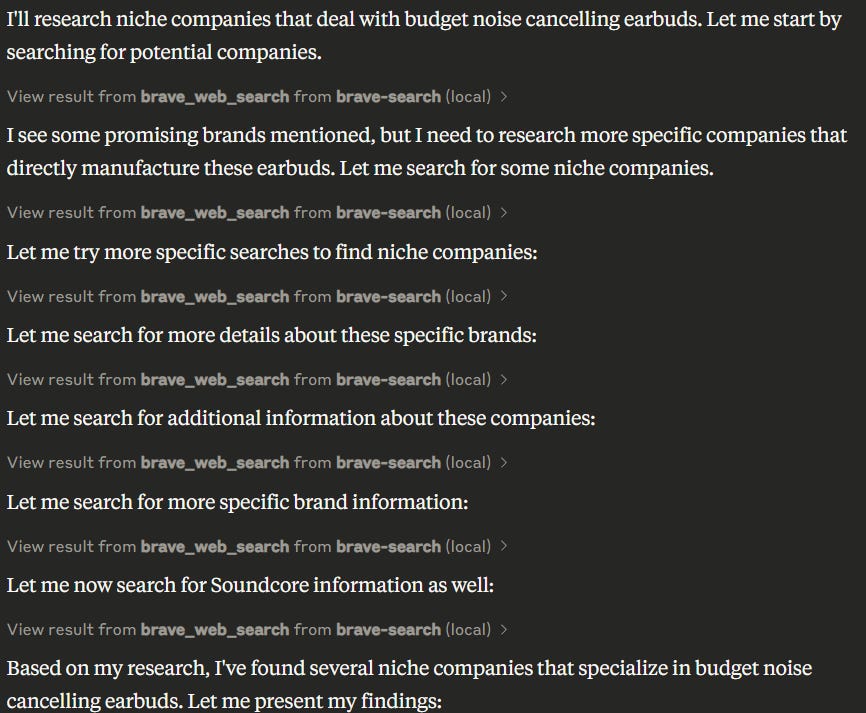
Here we can see that the model finds the first few results. Then decides to dive deeper, and checks out the individual brands to get a bigger picture, before deciding it has found enough information. The end result? Four quality results.
Better Function Calling: Another development with LLM’s is the strong emphasis across the industry on enhancing function calling (or tool use). Models are being explicitly trained to reliably understand when a tool is needed, what information to provide to it, and how to use the tool's response. We're seeing this everywhere:
Small models: Models like Mistral Small 3.1 (a 24B parameter model) and Gemma 3 series show significantly improved function-calling capabilities even at smaller sizes.
Peak Performance: Sonnet 3.7 isn’t the only extremely capable model: Google's Gemini 2.5 Pro currently leads the pack in function calling benchmarks, with a massive 64k max token output.
Steady Progress: DeepSeek's V3 model got a big update earlier this week (end of march) and one of it’s biggest improvements is better function calling.
Speed and Affordability: Alongside these capability leaps, the cost of running high-quality models continues to drop, and their speed increases. What required expensive, slow models a year ago might now be achievable with faster, cheaper, yet highly capable alternatives.
Standardized Tool Integration and Ecosystem:
MCP (The "USB Port"): The Model Context Protocol (MCP) provides a valuable standard for how models discover and interact with tools. Instead of custom code for every model-tool pair, MCP allows tool creators (like Make.com for integrating with apps, or developers providing file access) to build one MCP server that any tool calling model can potentially use.
While connecting tools isn't new, MCP provides a crucial standard, making it much easier for models and tools to connect without custom integrations, thus lowering the effort required to explore diverse use cases.
Modern Agent Frameworks: This standardization fuels, and is fueled by, a new generation of agent-building tools. Frameworks like PydanticAI and SDKs like OpenAI's agent tools are built with robust function calling and standardized interaction in mind. No more prompt-based multi-agent systems, but we’re moving towards more reliable, integrated systems where tool use is an integral part, not a clever hack.

These advancements, specifically models that can reliably use tools for longer combined with easier ways to give them those tools, shift the focus. Building simple agentic workflows is less about complex engineering and intricate prompting, and more about clearly defining your task and leveraging the improving capabilities and standardization.
A Straightforward Framework for Your First Agentic Workflow
Ready to build your own? Here’s a straightforward approach. (Note: For now, assume you'll be manually triggering these workflows when you need them, rather than having them run automatically on a schedule). I’d recommend simply starting with Claude Desktop App to run this in, and Sonnet 3.7 as the model.

Step 1: Define Your Workflow Goal (Focus on Repetition!)
First, identify the goal of the task you want to automate. What outcome are you looking for? Crucially, focus on repetitive tasks. Is this something you do daily, weekly, or monthly? Does it involve processing similar information sources or performing the same actions regularly? Automating these recurring goals offers the biggest payoff. Don't worry about how it will be done yet, just define the desired end result.
Think about:
Reports you need to create frequently.
Information you need to find online regularly.
Data you routinely gather or process.
Repetitive communication or data entry.
If you need inspiration, you can explore available tools via platforms that share MCP servers (which might spark ideas about what is possible):
Here are some examples of high-level workflow goals:
Example A (Company Update): "Keep track of new product announcements or major news about a specific company." (Requires user to provide company name when run).
Example B (Process New Leads): "Extract key information (contact details, interest) from provided new lead communications and organize it." (Requires user to provide lead communication text/file when run).
Example C (Monthly Social Media Summary): "Generate a monthly summary of key social media performance metrics." (Requires access to exported platform data).
Example D (Custom News Briefing): "Create a concise news briefing on specific topics." (Requires user to provide topics when run).
Example E (Competitor Snapshot): "Gather information on a competitor's products, market positioning, and contact details, comparing them to your own product." (Requires user to provide competitor name and own product details when run).
Example F (Transaction Categorization): "Categorize transactions from an uploaded monthly financial statement." (Requires user to upload statement file when run).
Step 2: Identify Necessary Tools & Feasibility
Now that you have a clear goal from Step 1, think about how it could realistically be achieved using AI and available tools. Can the whole task be automated, or could we save significant time by automating a section of it? Can the task be done with fundamental tools like web browsing? Do you need access to specific files? Would an MCP tool (connecting to cloud storage, a memory tool, or a file reader) be necessary? List the potential tools required to bridge the gap between the goal and a practical implementation. (Based on your chosen example from Step 1, list the tools needed, e.g., For Example A, you'd likely need Web search and perhaps a 'memory tool' to avoid reporting old news).
Step 3: Explain the Detailed Process (Instruct Your "Intern")
With the goal defined (Step 1) and the potential tools identified (Step 2), start describing the entire step-by-step process as if you were explaining it to a smart intern. Include the details, nuances, decision points, and potential pitfalls you anticipate. Don't worry about perfect structure or exact tool usage details yet; just ramble and get the core logic down. (Write out the initial detailed explanation for your chosen example here).
Step 4: Install, Test, and Understand Your Tools
Before finalizing the detailed instructions, it's crucial to test the tools you identified in Step 2. Remember, you won't be using these tools directly; you'll be instructing the AI to use them via function calling.
Setup: Install or configure any necessary MCP servers or other tools according to their documentation. Ensure they are accessible to the AI model you plan to use.
Experiment: Give the AI model small, specific sub-tasks related to your overall workflow that require using the installed tools. For example, instruct it: "Fetch data for key 'XYZ' using the memory tool," or "Using the file reader tool, categorize these three transactions based on these rules: [...]".
Collaborate & Learn: After the model attempts the sub-tasks, ask it to explain the interactions. What worked? What failed, and why? Crucially, instruct the model: "Summarize what you learned about the effective way to use each tool based on these tests. What specific parameters were needed? Was specific wording required? Did the input/output need a certain format? How should the memory tool keys be structured? What layout does the file tool expect?" Review the model's explanation and the conversation history to understand the nuances of tool usage from the AI's perspective.
After some testing has been done, you can have it create a nice starting point:

Standardize: Based on the model's explanations and your observations during testing, refine your understanding of how the tools must be used consistently for your workflow. Think of this as creating clear, step-by-step instructions for the AI itself on how to use its tools reliably for this specific task. These refined instructions will be crucial for the final prompt.

This testing phase is invaluable. It confirms the tools work as expected when called by the AI and gives you concrete details about how to instruct the AI to use them effectively, preventing guesswork in the next step.
Step 5: Structure the Prompt
Now, take your initial detailed explanation (from Step 3) and enrich it with the specific findings and standardized tool usage instructions you discovered in Step 4. Use a tool like Claude's prompt builder, or refine it manually, to turn this comprehensive information into a well-structured prompt for the AI model. Organize the steps logically, clarify constraints, define the desired output format, and explicitly detail how the model should use each specific tool based on your testing. Incorporating the learnings from Step 4 here will make a big difference in the quality and reliability of your first attempt.
Step 6: Refine and Test
With your detailed, tool-aware prompt ready, test the entire workflow with the model and the intended tools enabled. Review the results carefully. Does it achieve the goal from Step 1? Does it follow the process? Does it use the tools correctly? You might need to tweak the prompt wording, the process steps, or even reconsider tool usage based on this full test. Iterate until it works reliably.
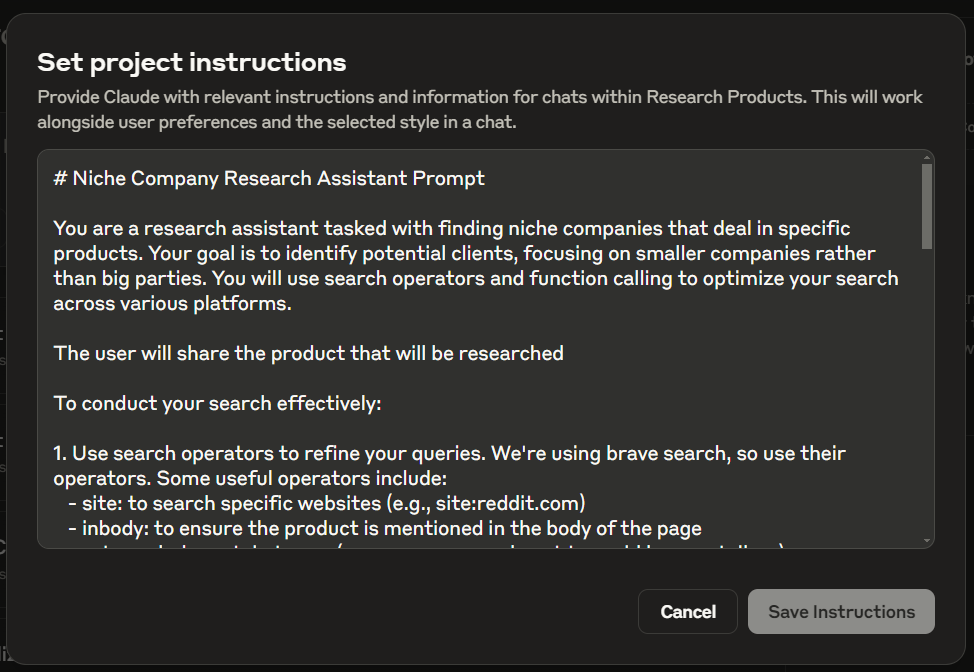
Step 7: Deploy (e.g., Claude Projects)
Put your refined prompt and the configured tools into an interface like Claude Projects. Now you have a reusable agentic workflow, ready to be triggered manually!
Example
# **Prompt: Process Negotiation Notes & Send Contract via DocuSign**

## **Goal:**

Analyze unstructured negotiation notes provided by the user to extract key agreed-upon commercial terms (e.g., Price, Payment Terms, Start Date). **Present these extracted terms along with client details to the user for confirmation.** Only after confirmation, use these terms to populate a standard contract template (ID: `YOUR_CONTRACT_TEMPLATE_ID`) in DocuSign and send it to the specified client for signature.

## **Context & Tools:**

* **DocuSign Account Info:** Use `YOUR_ACCOUNT_ID` and the appropriate Base URI for API calls.
* **Target DocuSign Template ID:** `YOUR_CONTRACT_TEMPLATE_ID` (Refers to your standard contract template).
* **Recipient Role Name in Template:** Assume `"ClientSigner"` or similar. (Verify for your template).
* **Key Terms to Extract from Notes:** The AI should look for and extract values for:
    * `Final Agreed Price` (numeric or currency string)
    * `Payment Schedule` (text description, e.g., "Net 30", "50% upfront, 50% on completion")
    * `Project Start Date` (date string, e.g., "YYYY-MM-DD")
    * `Project Scope Summary` (brief text description)
* **Key Fillable Fields (Tabs) in Template (Use descriptive placeholders):** The DocuSign tool needs to map these descriptive placeholders to the actual text tabs (`textTabs`) in your template:
    * `"Contract Price Field"`
    * `"Payment Terms Description Field"`
    * `"Agreement Start Date Field"`
    * `"Scope Summary Field"`
    * `"Client Full Name Field"` (Standard field, likely `fullNameTabs`)
* **Required Tools:**
    1.  **`docusign_send_template`** (Generic DocuSign Tool):
        * **Purpose:** Sends a specified DocuSign template to a recipient with pre-filled data.
        * **Input:** Requires a JSON payload adhering to the DocuSign API structure. Needs `templateId`, `templateRoles` (with `email`, `name`, `roleName`, `tabs`), `emailSubject`, `status`. The `tabs` object should contain appropriate entries for `textTabs`, `fullNameTabs`, etc., mapping descriptive labels to values.
            * *`Example Input Payload Structure (focus on tabs):`*
                ```json
                {
                  // ... other fields like templateId, templateRoles.email/name/roleName ...
                  "templateRoles": [ {
                    // ... email, name, roleName ...
                    "tabs": {
                      "textTabs": [
                        { "tabLabel": "Contract Price Field", "value": "Extracted Price" },
                        { "tabLabel": "Payment Terms Description Field", "value": "Extracted Schedule" },
                        { "tabLabel": "Agreement Start Date Field", "value": "Extracted Date" },
                        { "tabLabel": "Scope Summary Field", "value": "Extracted Scope Summary" }
                        // Add other textTabs as needed
                      ],
                      "fullNameTabs": [
                        { "tabLabel": "Client Full Name Field", "value": "Client Name Input" }
                      ]
                      // Add other tab types like signHereTabs, dateSignedTabs if they exist but don't need pre-filling
                    }
                  } ],
                  // ... emailSubject, status ...
                }
                ```
        * **Output:** Confirmation (e.g., `{ "status": "sent", "envelopeId": "..." }`) or error.

## **Required Inputs (Ask user if not provided):**

1.  **Negotiation Notes:** (Unstructured text containing the agreed terms).
2.  **Client Full Name:**
3.  **Client Email Address:**

## **Workflow Steps:**

1.  **Get Inputs:** Ensure you have the Negotiation Notes, Client Full Name, and Client Email Address from the user.
2.  **Extract Key Terms (AI Task):** Carefully analyze the provided **Negotiation Notes**. Identify and extract the values for the following key terms defined in the Context: `Final Agreed Price`, `Payment Schedule`, `Project Start Date`, `Project Scope Summary`. Store the extracted values (or note if a term was not found).
3.  **Present Extracted Data & Request Confirmation (Mandatory Human-in-the-Loop):**
    * Present *all* the key information that will be used to populate the DocuSign envelope clearly to the user. This includes:
        * Extracted `Final Agreed Price`: \[Value or "Not Found"\]
        * Extracted `Payment Schedule`: \[Value or "Not Found"\]
        * Extracted `Project Start Date`: \[Value or "Not Found"\]
        * Extracted `Project Scope Summary`: \[Value or "Not Found"\]
        * Client Full Name (from input): \[Value\]
        * Client Email Address (from input): \[Value\]
    * Explicitly state if any of the required extracted terms (`Price`, `Schedule`, `Start Date`, `Scope`) were not found in the notes.
    * Ask the user: *"Please review the information above. Is it correct and complete? Shall I proceed with sending the DocuSign contract?"*
    * **CRITICAL: Do not proceed to the next step without explicit confirmation from the user (e.g., "Yes", "Confirmed", "Proceed").** If the user indicates data is incorrect or missing, stop and await further instructions or corrected data from the user.
4.  **Prepare DocuSign Tab Data (Post-Confirmation):** (Executed only after user confirmation in Step 3) Create the `tabs` object for the DocuSign payload. Use the *specific tab types* (`textTabs`, `fullNameTabs`) relevant to the fields being populated. Map the *descriptive placeholders* (e.g., `"Contract Price Field"`) to the *confirmed values* (either extracted or corrected by the user).
    ```json
    // Example 'tabs' object structure:
    {
      "textTabs": [
        { "tabLabel": "Contract Price Field", "value": confirmed_price },
        { "tabLabel": "Payment Terms Description Field", "value": confirmed_schedule },
        { "tabLabel": "Agreement Start Date Field", "value": confirmed_start_date },
        { "tabLabel": "Scope Summary Field", "value": confirmed_scope_summary }
      ],
      "fullNameTabs": [
        { "tabLabel": "Client Full Name Field", "value": client_full_name } // From user input
      ]
      // Add other required tab types/labels here based on Step 4 findings
    }
    ```
5.  **Construct DocuSign Payload (Post-Confirmation):** (Executed only after user confirmation in Step 3) Assemble the complete JSON payload for the `docusign_send_template` tool, following the example structure. Fill placeholders (`YOUR_CONTRACT_TEMPLATE_ID`, client email/name, subject) and insert the `tabs` object created in Step 4 using the confirmed data.
    ```json
    // Example Final Payload:
    {
      "templateId": "YOUR_CONTRACT_TEMPLATE_ID",
      "templateRoles": [
        {
          "email": client_email,          // From user input
          "name": client_full_name,       // From user input
          "roleName": "ClientSigner",     // Assumed/Verified role
          "tabs": { /* Insert 'tabs' object from Step 4 here using confirmed values */ }
        }
      ],
      "emailSubject": "Action Required: Contract for {client_full_name}", // Personalize
      "status": "sent"
    }
    ```
6.  **Execute DocuSign Send (Post-Confirmation):** Only perform this step after receiving explicit user confirmation in Step 3. Call the `docusign_send_template` tool with the complete JSON payload constructed in Step 5.
7.  **Confirm Result & Report:** Analyze the tool's response. Inform the user whether the envelope was sent successfully (e.g., "Contract sent to {client_full_name} with ID: ...") or report any errors encountered during the sending process.

## **Important Notes for AI:**

* Focus on accurately extracting the specified key terms from the potentially messy **Negotiation Notes**.
* **Crucially, always await explicit user confirmation in Step 3 before preparing the final payload (Step 4 & 5) and calling the DocuSign tool (Step 6).**
* If the user provides corrections in Step 3, use the corrected data when preparing the payload in subsequent steps.
* Use the *descriptive placeholders* (e.g., `"Contract Price Field"`) when constructing the `tabs` object. Assume the `docusign_send_template` tool maps these correctly.
* Use placeholders `YOUR_CONTRACT_TEMPLATE_ID` and `YOUR_ACCOUNT_ID` unless overridden.
* Handle errors gracefully, especially if terms cannot be extracted or the DocuSign tool fails.
Beyond Manual Triggers: Next Steps
Once your workflow is running reliably when triggered manually (e.g., within Claude Projects), you might consider taking the next step towards fuller automation. Frameworks like OpenAI's agent SDK, Mastra, or PydanticAI are designed for building more complex agents. Many of these also support or are adopting standards like MCP, allowing you to potentially reuse the tools and logic you've already tested. While using a chat interface like Claude's is a great way to start and validate your workflow, these frameworks offer pathways to integrate your agent more deeply into other systems or run it on automated schedules.
This framework allows you to leverage the power of modern AI and tools like MCP without needing deep coding expertise for many automation tasks. You focus on clearly explaining what needs to be done, and the AI handles the how.
Love this. Would you be able to share the full project instructions in Step 7 here?