SQLCoder-2–7b: How to Reliably Query Data in Natural Language, on Consumer Hardware
How we can leverage advances in AI to query our data locally using natural language, on your own PC.
This will be the last article I publish on Substack. Because of several different reasons, I’m moving to Medium. You can find me here:
https://medium.com/@sjoerd.tiem
How we can leverage advances in AI to query our data locally using natural language, on your own PC.
Over the last few months, I’ve written multiple times about advances in both AI and the usability of AI. More and more is possible every day with really good, fine-tuned local models coming out, and I’d like to dive into an extremely practical and attainable example of that, which is querying your own data (CSV/Excel/SQL) on a system that’s a 100% local. Whether it’s Mac, Linux or Windows, with maybe 8 GB of RAM for decent performance.
At the beginning of February 2024 defog released SQLCoder-7b-2. It’s a large language model fine-tuned to write SQL queries. 7b parameters mean it’s small enough to run on consumer hardware. No need to invest in extremely expensive GPUs or hundreds of gigabytes of RAM.
Next to that, software like LM Studio makes it easy to run local models and communicate with them on your computer.
With the model and the ability to run the model, we need one last piece of the puzzle to combine it and create an interface. In comes Streamlit, an open-source Python framework for machine learning and data science that works well with Generative AI, allowing us to create an interface to query our Data. I’ll provide the code, so you can play around!
So the three pieces to this puzzle are:
SQLCoder-2 7b — There’s also a 15b and a 70b model if you have the hardware for it.
Important note:
SQLCoder-2 is built specifically for writing SQL queries. This model isn’t built to haveback and forth conversations. This means we can ask questions and have it write queries, and directly apply those to see the result.
Let’s get started with getting the model up and running in LM Studio.
Loading the model
While LM Studio is easy to install and use, optimizing it can be a bit finnicky as it largely depends on your hardware and what it can or can’t handle. This is the same for the alternatives. It takes a bit of trial and error, and we’ll get into that.
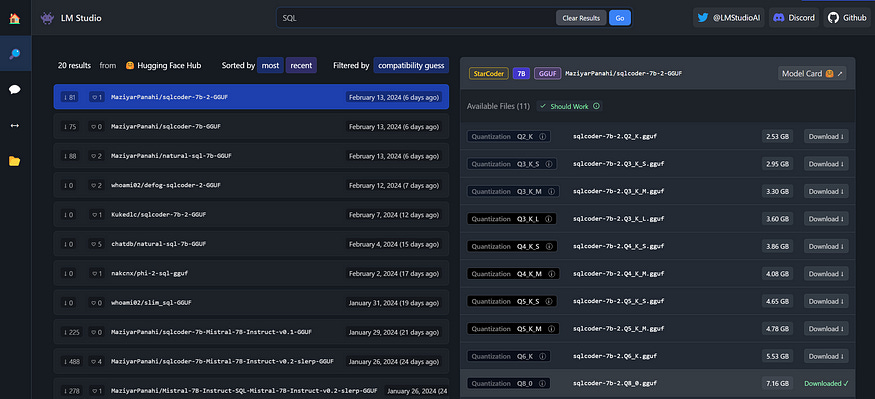
Once you have LM Studio installed, search for SQLCoder. Select the 7b-2 version, and pick preferably the largest size quantization your PC can handle.
The different versions from Q2 until Q8 are Quantized versions of the same model. Simply put, it’s like turning a high quality audio file into an mp3. Quantization significantly reduces the file size at the cost of a hit in quality. The lower the number is, the smaller the filesize gets but the worse the quality gets, too. Generally it’s good practice to steer away from models smaller than Q4.
Go to the server tab on the left, select the model in the big blue bar at the top. The model supports a large context length, but a large context length also means a lot of memory. We’re passing along the whole database schema to the model, which means we need some context length, but this takes up a lot of (V)RAM. 8000 tokens is a very safe bet, but you can go quite a bit lower. If you’re strapped for memory, try and see how small you can go before getting any errors when running in a bit.
Then there’s GPU offload. These models perform much faster when loaded onto VRAM instead of regular RAM. You can (partially) load the model onto VRAM by turning on GPU offload on the right under server model settings. The model has 35 layers in total, and you can play around with the amount of layers. It’s a bit of trial and error and completely depends on the amount of VRAM you have. Play with those numbers, see what happens. If you get an error, reduce the number. For comparison, here’s what happens on my system with zero offloading and with all layers offloaded on to my GPU:
As for the model, it performs the best when provided with the following prompt:
### Task
Generate a SQL query to answer [QUESTION]{user_question}[/QUESTION]

### Database Schema
The query will run on a database with the following schema:
{table_metadata_string_DDL_statements}

### Answer
Given the database schema, here is the SQL query that [QUESTION]{user_question}[/QUESTION]
[SQL]
This grounds the model in the types of SQL queries it will generate, and will be handled in the code properly so that you can simply select the database, and start chatting away.
As for Streamlit, if you have Python installed (if you don’t, this is a task that GPT-4 is very capable of helping you with) you can install it with pip alongside some other important packages that will be necessary.
Open your terminal and run the following code:
pip install streamlit openai pandasNow we’re all set to get started with Streamlit!
Want to read more? Follow me on Medium!
Streamlit Code
We need both Streamlit code and a “database”. For ease of use, we’re using SQLite. Further below I’ve provided a script below to turn a csv into a .db file we can use with this app. But first, the Streamlit app.
The Streamlit app needs to do the following:
Let the user select the database
Provide an interface to ask questions
Build the prompt
Communicate with LM Studio
Apply query to the database
Show results
I’ve got everything ready for you to copy and paste.
import os
import sqlite3
import streamlit as st
from openai import OpenAI
import pandas as pd

st.title('🔍 Query Your Data')

# Assuming you've set your OPENAI_API_KEY in your environment variables,
# otherwise set it directly with openai.api_key = "your-api-key"
client = OpenAI(base_url="http://localhost:1234/v1", api_key="not-needed")

# List all SQLite databases in the /databases/ directory
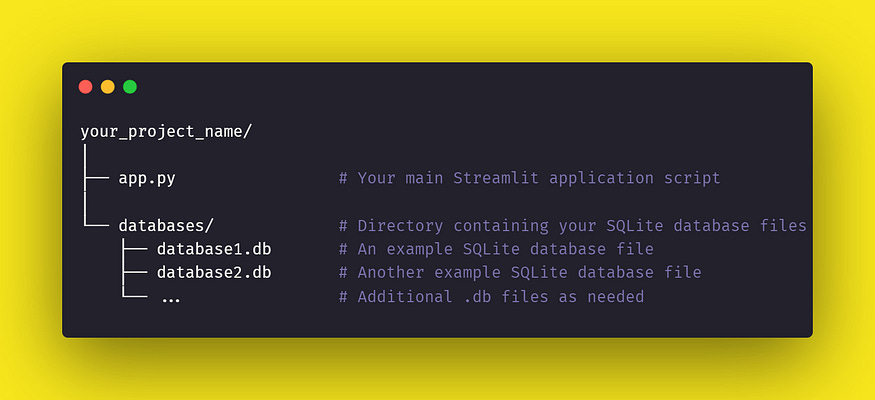
databases = [db for db in os.listdir('databases/') if db.endswith('.db')]

# Create a dropdown menu in the sidebar for database selection
selected_db = st.sidebar.selectbox('Select a database:', databases)

def get_schema(db_path):
    """Extract the schema (DDL) from an SQLite database."""
    conn = sqlite3.connect(db_path)
    cursor = conn.cursor()
    cursor.execute("SELECT sql FROM sqlite_master WHERE type='table';")
    schema = "\n".join([row[0] for row in cursor.fetchall()])
    cursor.close()
    conn.close()
    return schema

def adjust_sql_for_sqlite(sql_query):
    """Adjusts an SQL query to be more compatible with SQLite."""
    adjusted_query = sql_query.replace("ILIKE", "LIKE")
    adjusted_query = adjusted_query.replace("TRUE", "1").replace("FALSE", "0")
    # Add more adjustments here as needed
    return adjusted_query

def generate_response(input_text, selected_db):
    db_schema = get_schema(f'databases/{selected_db}')

    prompt = f"""
### Task
Generate a SQL query to answer [QUESTION]{input_text}[/QUESTION]

### Database Schema
The query will run on a database with the following schema:
{db_schema}

### Answer
Given the database schema, here is the SQL query that [QUESTION]{input_text}[/QUESTION]
[SQL]

"""

    response = client.chat.completions.create(
        model="sql",
        messages=[
            {"role": "user", "content": prompt}
        ],
        temperature=0.3,
        stream=True,
    )

    expander = st.expander("SQL Query", expanded=True)
    with expander:
        stream = st.write_stream(response)
    sql_query = stream

    # Adjust the SQL query for SQLite compatibility
    adjusted_sql_query = adjust_sql_for_sqlite(sql_query)

    # Execute the adjusted SQL query and return the result
    conn = sqlite3.connect(f'databases/{selected_db}')
    cursor = conn.cursor()
    try:
        cursor.execute(adjusted_sql_query)  # Use the adjusted SQL query here
        rows = cursor.fetchall()

        # Convert the query results into a DataFrame for display below the expander
        if rows:
            columns = [description[0] for description in cursor.description]
            df = pd.DataFrame(rows, columns=columns)
            st.write(df)  # Display the DataFrame below the expander
        else:
            st.info("Query executed successfully, but no data was returned.")
    except Exception as e:
        st.error(f"Error executing SQL query: {e}")
    finally:
        cursor.close()
        conn.close()


with st.form('my_form'):
    text = st.text_area('Enter text:', 'Who won the most gold medals in 2012?')
    submitted = st.form_submit_button('Submit')
    if submitted:
        generate_response(text, selected_db)
Save this as app.py. You can run it by opening a terminal in the same folder as app.py is located, and run the following command:
streamlit run app.pyThis is how it all works:
Once you click the Submit button, the generate_response function will get to work. The get_schema(db_path) function will be called and automatically grab the database schema that is to be inserted in the prompt. It combines it with the template, the question asked and sends it over to LM studio to handle.
At that point, LM Studio will get to work and through the extremely new st.write_stream in Streamlit, you will see the query being generated in real time. Once a query is generated, it’ll execute it on the selected database, and show the end result in a dataframe.
Database Setup
As mentioned earlier, here’s a little script you can run to turn a csv file into a .db file.
import pandas as pd
import sqlite3
import os

# Step 1: Load the CSV data into a pandas DataFrame
csv_file = 'Summer_Olympic_medals.csv'
df = pd.read_csv(csv_file)

# Extract the base name of the file without the extension
base_name = os.path.splitext(os.path.basename(csv_file))[0]

# Step 2: Create a connection to a SQLite database
db_file = base_name + '.db'
conn = sqlite3.connect(db_file)

# Step 3: Write the DataFrame to the SQLite database
df.to_sql(base_name, conn, if_exists='replace', index=False)

# Don't forget to close the connection
conn.close()
Put this script in the same folder as the csv file, adjust the file name and run by typing Python tosqlite.py. This will create a db file. Put the newly created .db file in the databases folder and it’s all set! Now you can ask queries and see the direct result!
A few important notes
While this is exciting and the model is VERY capable for its size, I want to mention a few important notes.
The model CAN execute destructive queries that could be difficult to roll back. If you want to use this in more important settings, make sure it has the right permissions.
We’re using SQLite here for demonstration purposes, however, the model is fine-tuned to work with regular SQL and there’s are small differences between the two. For the sake of the demonstration, I’ve added a small extra function in the code that replaces two simple but common differences to prevent errors.
If you want to actually chat, you’d have to combine it with a different model.
The 7b model does a good job of writing queries, but often requires specific instructions. In the Olympics example (found on Kaggle) it sometimes mixes up Host country and Country name. This can be solved by being more specific in your queries, and the larger models (15b and 70b one) are much better at inferring column names.
I’ve got everything on my Github, with a more extensive version that adds a little bit of extra functionality, if you want to take a look!


