


The USB Port for AI: MCP in Action
How Make.com and MCP create a no-code bridge between AI models and your favorite tools

MCP is transforming how AI models connect with external tools, and this guide will take you from concept to implementation. You'll discover what the Model Context Protocol is and why it matters, learn how to set up your own MCP server with Make.com, and follow a step-by-step tutorial to create scenarios that Claude can trigger with simple natural language. By the end, you'll have the skills to let Claude interact with your favorite apps and services - no coding required and no more waiting for official integrations.
What is MCP? A USB Port for AI Systems
MCP establishes a common language that lets AI systems discover and work with external tools without custom integrations for each service. Anthropic describes it as the "USB-C port for AI models" - an apt comparison that captures its function.
The protocol consists of three components:
1. The Host
The application or system that manages MCP functionality. Examples include the Claude Desktop App, Cherry Studio, or a coding environment like Cursor. The host provides the environment where the AI operates.
2. The Client
The intermediary that handles communication between the AI model and the server. Unlike some middleware that eventually disappears, the client actively manages the ongoing communication between model and server.
3. The Server
The installable component that standardizes how tools communicate with AI models. Servers can be built for specific services or functions - from web search to database access to coding assistance.
Solving the N×M Integration Problem
MCP addresses a fundamental scaling issue in AI integrations. Without a standard protocol, connecting multiple AI models to multiple tools creates an exponential integration challenge:
Without MCP:
Every model needs a custom implementation for each tool
If you have N models and M tools, you need N×M integrations
Example: Connecting 4 models (GPT-4o, Claude 3.7 Sonnet, Llama 3, Mistral Small) to just 3 tools (Notion, Web Search, Memory) requires 12 separate integrations
With MCP:
Each tool only needs to implement the MCP standard once
Each model provider only needs to support MCP once
The total becomes N+M integration points instead of N×M
The practical benefit is true interoperability. When an MCP server is created for a tool:
It works immediately with any Function calling-compatible model
Users can freely switch between models based on their performance, cost, or other factors
No waiting for the tool maker to build custom integrations for each new model
This creates a flexible ecosystem where you can use tools built by others without being locked into specific model providers. As a user, you can choose the best model for your needs while maintaining access to all your tools.
Where MCP is Being Used Today
MCP hosts fall into three main categories:
1. Chat Applications
Claude Desktop App
These chat interfaces provide the simplest way to start using MCP-connected tools.
2. AI Coding Tools
Cursor: Code editor enhanced with MCP-connected AI
Claude Code: Anthropic's command-line AI coding assistant
For tools, MCP can be used to instantly give AI access to local files, documentation, and codebase context, adding new features to allow them to take more tasks out of the developers hands.
3. AI Agent Frameworks
Mastra: TypeScript framework for AI agents
PydanticAI: Python framework from the creators of Pydantic
These frameworks use MCP to standardize how AI agents interact with their environment. Again, instead of having to create custom integrations, just plug a function-calling compatible model into an MCP server.
Agentic Workflows made easy through MCP
If you wanted to automate market research in the past, you’d probably use a tool like Perplexity, followed by storing that information somewhere, giving it instructions on where to find what information.
From triggers, to different research modules, to processing the data, storing it, setting it up and sending them.

The new approach?
Simply ask a question and let Claude handle the rest.
"Research sustainable packaging trends and create a client report."
Claude automatically:
Runs multiple web searches to find relevant information
Fetches specific pages to extract detailed data
Combines and synthesizes findings from various sources
Populates a template with the gathered information
No predefined workflow needed - Claude decides on its own which tools to use and when:
Runs sequential web searches to refine findings
Knows when to browse deeper into specific sources
Stores intermediate findings as needed
Formats and structures information appropriately
The key difference: The process might involve the same basic steps, but it's now driven entirely by a capable model that independently decides which actions to take rather than following rigid, predefined pathways.
Recent MCP Implementation Examples
The protocol is spreading. It’s still very early days, but the popularity is growing, and it’s growing fast. Here are a few examples:
PydanticAI: One of the most popular AI agent frameworks implemented MCP this week at the time of writing this.
Bolt AI and LibreChat: Two very popular AI Chat Platforms have implementing MCP high up on their roadmap.
User-made MCP Servers are going viral: This server allows LLM’s to create 3D objects in blender
Big SaaS Companies are creating MCP Servers: Stripe, Cloudflare, Make.com (More on that one later) and others are creating MCP servers for users (or AI models) to use.
Make.com: No-Code AI Integration
For a long time Make.com has been my tool of choice for workflow automations, integrating it in client workflows, using it for both personal and business use cases. I’ve been losing touch with Make for a little while, as I’ve felt they’ve been a bit slow integrating AI compared to their direct competitors, n8n and Zapier. On top of that AI models capabilities of writing code has, for me, replaced Make.com for some uses.
But with one simple addition, my excitement has shot up again. Make.com has released their own MCP Server, and it’s phenomenal in it’s simplicity. It allows for easy integration of MCP’s into any service or automation you’d like to build. As a visual workflow builder, Make.com already connects thousands of services like Salesforce, Google Workspace, Notion as well as other AI services like Pinecone or Perplexity.
The setup requires that the model has access to a few, very basic tools. That’s all it needs.
The MCP server is very easy to set up. Once done, creating a scenario for the AI model to use is also very straightforward.
With their MCP server, users can:
Create automation flows with Make.com's visual interface
Connect these flows to Claude through MCP
Let AI trigger and use these automations through natural language
This in itself is nothing new. But the ease with which you can create and add new scenario’s for a model to use is unparalleled.
To be able to do this, we need a few things. First, we need to install the Make.com MCP Server. They’ve written instructions, but don’t explain properly how to create the API key and team ID. Follow along exactly as instructed, on the link above, and you can reference my instructions for creating the API key and retrieving the Team ID.
Creating the API key
The instructions on the GitHub page require you to create an API key, you can do so by logging into Make.com, click on your account in the bottom left, and going to “profile.”

Then, at the top, you can navigate to API access. Make sure to select check only the following as scope:
scenarios:read
scenarios:run
Once done, make sure to copy the API key.
Fetching Team ID
For the Team ID, click on Team in the left of the sidebar, and extract the numbers. It should look something like this: https://eu1.make.com/123456/team/dashboard
In this case, 123456 would be the Team ID.
Creating an MCP Compatible Scenario in Make.com
Once you’ve installed it, you might run into an error the first time you start up Claude again. The tool requires you to set up a scenario in a specific way, and if there are none set up this way, the MCP Server will throw an error.
No worries; building the first working scenario is easy! We’ll go through creating one step by step.
For anyone who is impatient and wants to play with this themselves:
To create a scenario that can be called as a tool you need the following:
A scenario that is set to run “On Demand”
Uses scenario inputs
(Not required) To deliver a result back to the model, you need to set up a “Scenario Output” module
As an example, we’ll create a tool that allows Claude to fetch the title, description and subtitles of a Youtube video based on a link. We can start by searching for a youtube video.
In Make.com, create a scenario like you normally would.
For the first module, we can search for Youtube.
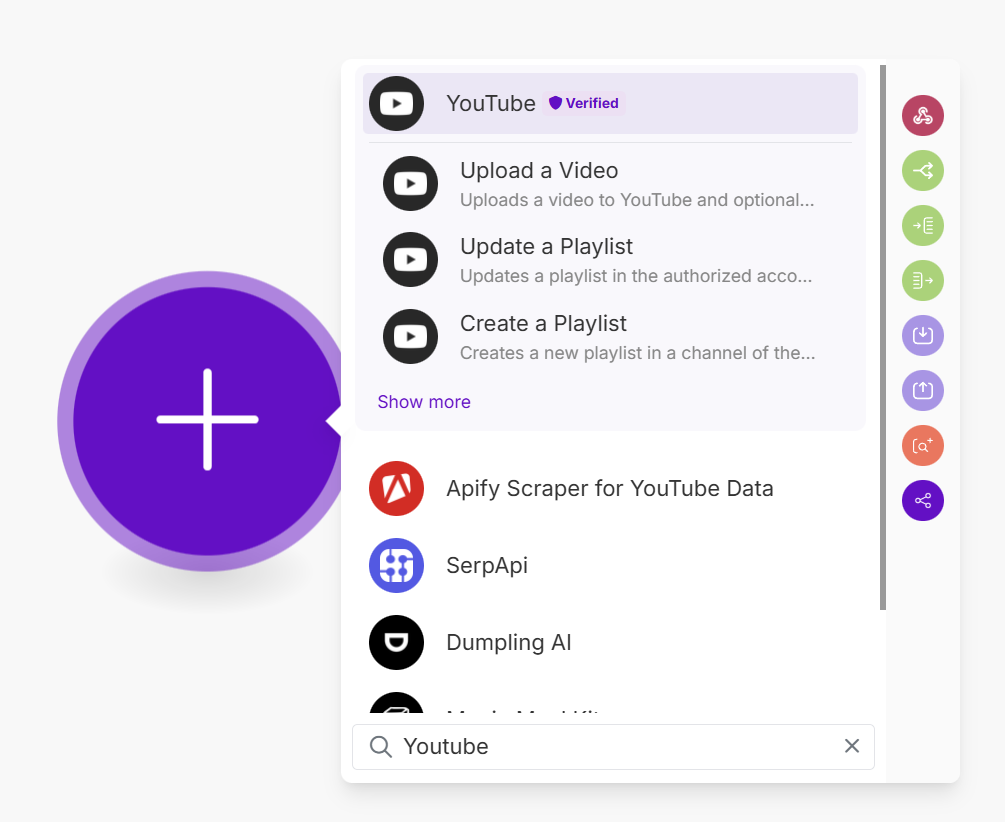
There’s the Apify Scraper for Youtube Data that we can use!
Click it, if needed sign up to create a connection. Once done, we can change two things.
As explained in the tooltip below, this tool can fetch channels, playlists, hashtags or searches. We want to test if it works, but we don’t really need more than just being able to fetch the information from a single video. Let’s hit X on the apify youtube channel to remove it, so we’re left with a single video.

Since we want the subtitles, let’s turn that settings on.

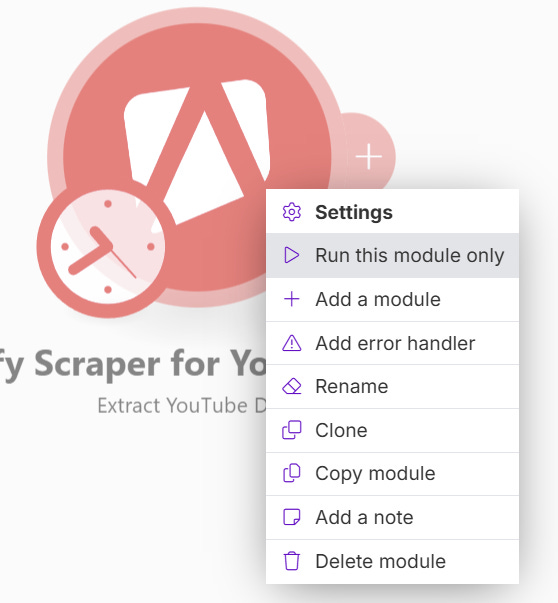
Hit Save. Now we can quickly test if its working by Right clicking the module, and picking “run this module only”.
We wait for a moment, and see what results come in (this can take a minute).
The output should look like this:

Now that we know that this works, we can create a “Scenario input” - this will let the model know what it can fill in, and we can put that in as a link. On the bar at the bottom, select scenario inputs and outputs.

The next step is adding an item.
Again: These inputs and their descriptions are what the model will see, and this is the data that the model will send to this scenario.

In my case, I filled it in like so. Gave it a very clear name and description, and selected required.

TIP: The name and description have a big impact on the ability of the model to call the tool. Take your time to properly describe how you’d like the model to fill in the information.
Click Save, and go back to the Apify module. Click on the URL field, clear the link out, and in the menu that pops up, go to “Custom and system variables” menu, under the curly brackets. Under scenario inputs, the input we just created pops up. Click it, and it should go into the URL field. Again, press save.

There’s two steps left. Now we need to add the module that will return the output to the AI model.
Create a new Module, and search for Return output. Select it. It will prompt you to add scenario output. Same as before with inputs. We can now create three items, one called Title, one called Description, one called Subtitles.
If the Return output module does not appear, you’re likely on a free account. You can still have Claude fill in data and call scenario’s, but you won’t be able to relay back any information.

Once you’ve created those, you can open the Return Output field. Click the empty fields (like Title) and Select from the information from Apify the information that you want to send. For description, you can select the “text” field, and for Subtitles, make sure to unfold subtitle and select SRT.

Again, hit Save. We’re almost done!
In the top left, change the name of the scenario to something that clearly describes for the AI model what this scenario will do. In my case:
“Fetch description and subtitles from a youtube video”
Save the scenario by clicking the Save button on the bottom bar.
Last Step!
For the model to discover this, we need to set a scenario to “On Demand”. Click on the little clock on the Apify Module. Change “At regular intervals” to on Demand.
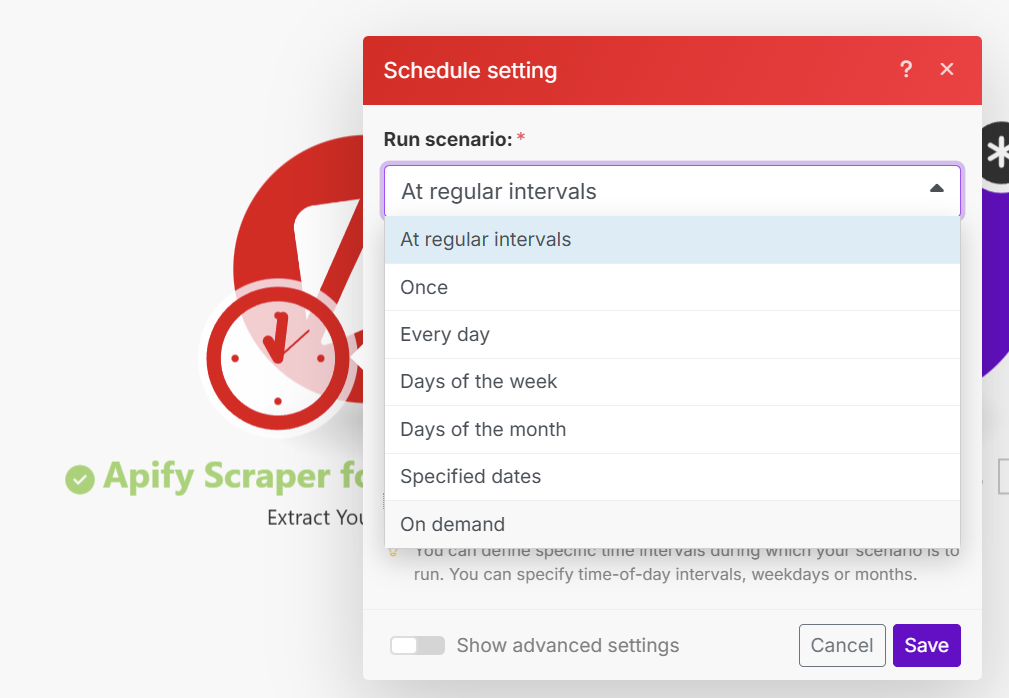
Your scenario should look like this:

We can now restart Claude Desktop App. Don’t just close it, properly quit the app. Fro windows users, use the taskbar in the bottom right, go to the hidden icons and right click and quit on the Claude icon. Start it back up again.
If you’ve done it correctly, a new tool should appear in the bottom right of the input field. You can click on it and see if it appears.

Would you look at that! It appears right away:

Done!

Beyond YouTube: What Else Can You Build?
Our YouTube example is just the beginning. The real power of Make.com's MCP integration comes from the platform's 1,000+ app connections and Claude's ability to intelligently choose when to use them.
Practical Use Cases You Can Build Today
Data Processing & Analysis
Have Claude extract data from uploaded PDFs and automatically populate spreadsheets
Ask Claude to analyze your Google Analytics data and prepare an executive summary
Let Claude transform messy CSV data into cleaned, categorized information
Content Workflows
Create a scenario where Claude can post to your social media accounts after generating content
Let Claude research topics, gather information, and directly update your Notion workspace
Personal Productivity
"Claude, update my project timeline based on the latest team updates"
"Search my emails for all conversations with ClientX and summarize the key points"
"Check my calendar for the next two weeks and suggest when I should schedule focused work time"
Resources to Explore
If you're ready to dive deeper into the MCP ecosystem, here are some resources to check out:
Cherry Studio allows you to experiment with different models including Mistral Small, which is one of the few smaller models capable of using MCP effectively. This is particularly interesting as Mistral Small can run 100% locally without requiring powerful hardware.
glama.ai and MCP.so both offer collections of ready-to-use MCP servers if you want to try different tools without setting them up yourself.
Note that while MCP enables powerful workflows with a single model like Claude, we haven't discussed multi-agent workflows here - that's a topic for another time.
The "USB Port for AI" In Practice
We started this article describing MCP as the "USB-C port for AI models" - and now that metaphor is becoming concrete. The protocol delivers on its promise: connecting any function-calling model to any service with minimal integration work.
What's compelling about the MCP approach is how it changes everyday workflows. Tools aren't just triggered by schedules or events anymore - they can be discovered, selected, and used by AI models through natural conversation. The YouTube example we walked through shows how straightforward this can be, but the same principles apply to any workflow you can imagine building.
While others wait for official integrations between their favorite AI and essential tools, you can build these connections today. It’s still a little clunky (especially adding new servers) - but it’s getting better by the day.
The ecosystem around MCP is growing, with platforms like glama.ai and MCP.so curating collections of ready-to-use servers. On top of that, more platforms that act as a host are coming out day by day. Whether you use Make.com or explore other options like Cherry Studio, the important thing is that MCP puts you in control of what your AI can do, tailored to your specific needs.
Marvellous. I've just started tinkering and investing time in N8N (got to support European software companies) but you suggest switching to make.com instead? I'm guessing n8n will eventually support MCP.