
Turn a Custom GPT into a Note-Taking Super Assistant
Supercharge and hyper-personalize your own custom GPT's. Leverage Make.com

In this edition, I'm diving into a topic that I’ve written about before – the evolving synergy between AI-powered tools and our daily routines. If you've been following my journey since the post in June, you'll know that I've been exploring the building of automations that make use of language models like ChatGPT. A lot has changed in just a few months, and I'm here to unpack these changes and what they mean for us. If you’re interested in building this, I give you two options: I’ve built a CustomGPT to guide you through the process. You can also scroll down and follow the step-by-step process. All in all it shouldn’t take more than 20 minutes for the basic set-up.
Click this button to go there:
The Landscape Then and Now
Looking back at my experiences with Make.com earlier this year, it's clear that the world of AI and automation has been making progress, fast. Back then, certain functionalities felt just out of reach, or required a bit more elbow grease than we would've liked. Today, with the advancements in ChatGPT and Make.com's own updates, what was once a series of complicated steps is now a more streamlined process.
There’s been some big improvements for ChatGPT – we're talking about features like a more up-to-date knowledge base, the introduction of Custom GPTs, and even the integration of vision models. These aren't just incremental improvements; they're game-changers in how we interact with AI. They've simplified the complex and opened up new avenues for creativity and efficiency.
Make.com hasn't been left behind in this evolution. They've been fine-tuning their platform, making it more user-friendly and compatible with the powerful functionalities of AI tools. This brings me to what I'm really excited about – the practical, everyday applications of these advancements.
Why Obsidian?
So, what does this mean for you and me? Imagine taking the power of AI, with its ability to process, analyse, and generate content, and combining it with the automation capabilities of Make.com. The result is a setup where repetitive tasks, especially around note-taking and data management, become smoother and much more intuitive.
A great way to achieve is to let a Custom GPT store notes for you in Obsidian. Why? There’s a few reasons. First of all, Obsidian has made tagging and linking notes together one of it’s core features. You can go all out in adjusting how you like it, but that’s something for a different time. It supports markdown, tables, html, which ChatGPT knows how to use. On top of that it’s super easy to set it up in a Cloud service, allowing you to easily build this.
The Role of Custom GPT
I hinted at some of the reasons why a Custom GPT is great for this task, and it’s due to a bunch of reasons. You can instruct it how and when to tag your notes, you can turn it into a research assistant that uses browsing to store information with sources for you. If you’re handy with Make.com you can even make it retrieve your notes, but for simplicity’s sake we’re not going there (yet)
Think of Custom GPT as a flexible tool in your toolkit. It can adapt to what you need: a straightforward note-taker, a creative brainstorming partner, or even just a digital space to sort your thoughts. With the new vision model you can toss in an image of your meeting notes and have those stored nice and organized in seconds. The idea is to have a setup that works for you, without the hassle of keeping everything in order manually.
I use a big prompt that contains all relevant context, a guide on how to use the template, tag things etcetera. The Custom GPT can walk you through setting up one of your own.
Experiment with the Custom GPT
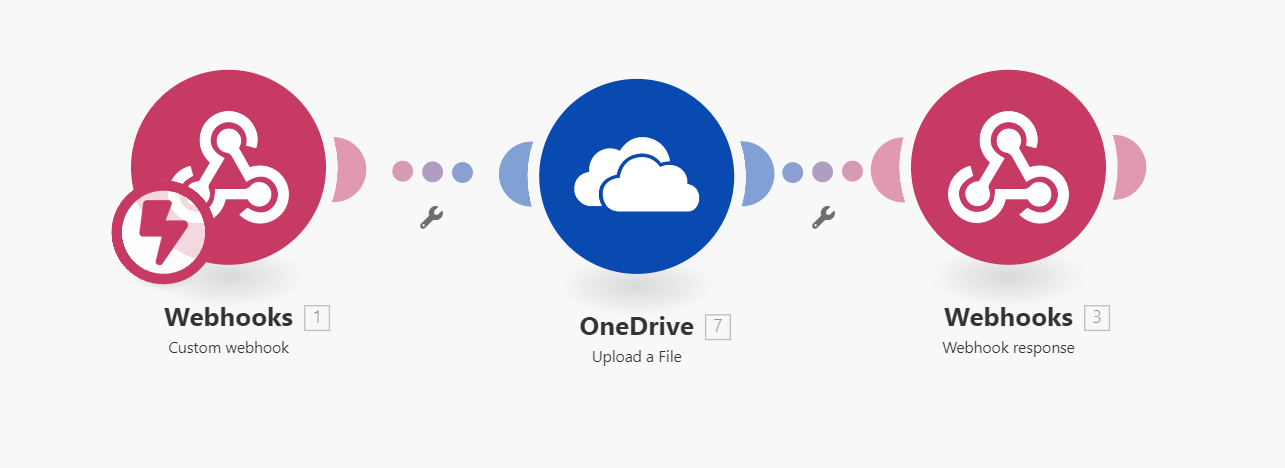
I can harper on and explain in great detail the steps you need to walk through, however, I opted not to do that. What I did instead was build a Custom GPT that can walk you through the process. I’ve added extra information on what to do when you run into issues, whether you’re a seasoned Make.com and Custom GPT expert or whether it’s new for you, it can help you! Also, the Make.com set-up is a total of three nodes.
I’ve put a simplified guide right below, but to get the full experience and turn it into something greater, I highly recommend checking out the Custom GPT I’ve built for this purpose. It can give prompting suggestion, offer you a blueprint to instantly load webhooks that take care of 75% of the work and some more. It allows me to dump as much information in there that only comes up when it needs to come up.
Step 1: Set Up Your Digital Notebook
Choose Your Tool: Start with Obsidian and make sure it’s set-up in the folder of cloud services like Dropbox, OneDrive, or Google Drive.
Step 2: Sync with a Cloud Service
Link to Cloud: Ensure your notes are syncing with your chosen cloud service.
Step 3: Dive into Make.com
Register and Create a Scenario: Sign up on Make.com and create a new scenario for automating your note-taking process.
Step 4: Establish a Custom Webhook in Make.com
Set Up Webhook: Add a 'Custom Webhook' in your Make.com scenario. This will be your bridge between the AI and the cloud service.
Step 5: Integrate Cloud Service for Uploads
Choose Cloud Node: Add the cloud service node in Make.com and select 'Upload file(s)'. Connect it to the folder where your digital notebook is stored.
Step 6: Configure Webhook Response
Set Response: Add a 'Webhook Response' node in Make.com. Configure it to confirm when notes are stored successfully.
Step 7: Activate and Test
Go Live: Turn on your scenario in Make.com and give it a quick test to ensure everything is working smoothly.
Step 8: Custom GPT Setup
Configure Custom GPT: Set up your Custom GPT with specific instructions for your note-taking style and preferences.
Final Touch
Remember, your Custom GPT is there to help with the specifics. Don’t hesitate to lean on it for detailed guidance through each of these steps. If needed, toss in an image of what you’re struggling with!